Google’s Compose Preview Screenshot Tests

We’re super excited to see Google announce Compose Preview Screenshot Tests. With this, screenshot testing is officially part of the Android ecosystem, and is now the recommended way to test your adaptive layouts across multiple device configuration.
If you missed the announcement, here’s the Google IO talk:
Building adaptive android apps
You might have questions on how to get started. It turns out, the easiest way for you to get started is with Screenshotbot and our Gradle integration. We’ll cover everything you need to know here, I’ll make no assumptions of prior knowledge.
For convenience, we’ll call this library CPST in this blog post. Jose Alcérreca tells me that this is pronounced “capeesh-t”, but there’s a chance he might’ve been pulling my leg.
But let’s show you how easy it is to get started with Screenshot tests using CPST and Screenshotbot.
Create a new Android Project
You can obviously ignore this step if you already have a Gradle based Android project. But for this walk-through, I’ll create a new standard Android application. I’m using Android Studio Koala here, it looked like the AGP version is incompatible with Jellyfish.
I’ve created an “Empty Activity” project. Conveniently, Android Studio sets up Jetpack Compose with some initial Composables for me.
@Composable
fun Greeting(name: String, modifier: Modifier = Modifier) {
    Text(
        text = "Hello $name!",
        modifier = modifier
    )
}

@Preview(showBackground = true)
@Composable
fun GreetingPreview() {
    MyApplicationTheme {
        Greeting("Android")
    }
}
Let’s use CPST to generate a screenshot test for this.
Add the CPST dependency
We’ll follow the Setup instructions for CPST. In libs.versions.toml, I add:
[versions]
agp = "8.5.0-beta02"
kotlin = "1.9.20"
...
screenshot = "0.0.1-alpha01"

[libraries]
...
androidx-compose-ui-tooling = { group = "androidx.compose.ui", name = "ui-tooling"}


[plugins]
...
screenshot = { id = "com.android.compose.screenshot", version.ref = "screenshot"}
And in my app/build.gradle.kts I add:
plugins {
    ...
    alias(libs.plugins.screenshot)
}
In my project gradle.properties I add:
android.experimental.enableScreenshotTest=trueIn app/build.gradle.kts, I add:
android {
    ...
    composeOptions {
        kotlinCompilerExtensionVersion = "1.5.4"
    }
    experimentalProperties["android.experimental.enableScreenshotTest"] = true
}

dependencies {
  screenshotTestImplementation(libs.androidx.compose.ui.tooling)
}
At this, you should have a new Gradle task, but running it will tell you there are no previews to screenshot:
a@c:~/AndroidStudioProjects/BlogApplication(master)$ ./gradlew :app:updateDebugScreenshotTest
...
> Task :app:updateDebugScreenshotTest
No reference images were updated because no previews were found.

BUILD SUCCESSFUL in 2s
Creating your first Preview
CPST requires you to designate compose previews to use with screenshot test, which will be a file inside the app/src/screenshotTest
At this point, I wasn’t sure how to create the new Kotlin file inside the screenshotTest source set from Android Studio, since it didn’t show my empty source set. I just manually created the Java file and manually moved it to app/src/screenshotTest/java.
In my case, the class looked like this:
package com.example.blogapplication


import androidx.compose.runtime.Composable
import androidx.compose.ui.tooling.preview.Preview
import com.example.blogapplication.ui.theme.BlogApplicationTheme

class ExamplePreviewsScreenshots {

    @Preview(showBackground = true)
    @Composable
    fun GreetingPreview() {
        BlogApplicationTheme {
            Greeting("Android!")
        }
    }
}
But this is it, you now have a very simple screenshot test with CPST! Let’s commit all our changes, because we’re going to play with a few different things now.
Running your Screenshot Test
If you don’t use Screenshotbot, at this point you can record screenshots into your repository using: ./gradlew :app:updateDebugScreenshotTest.
This generates a directory of screenshots like so: app/src/debug/screenshotTest/reference/com.example.blogapplication.ExamplePreviewsScreenshots.GreetingPreview_3d8b4969_da39a3ee_0.png
For this example, this image looks like this:

You can save this file into your repository, and on CI, you can run ./gradlew :app:validateDebugScreenshotTest.
This will work great for solo projects or really small teams, but this will be hard to scale up in medium or large teams.
Teaching your team
With this workflow, you have to teach your team how to use screenshot tests. Each time your colleague makes a UI change, they would have to re-update their golden screenshots.
This is a very labor-intensive and error-prone process. Our data at Screenshotbot shows that most UI changes are actually intentional. (After all, it’s a UI engineer’s job to change the UI. Unlike unit tests, a change to some view somewhere in the hierarchy will affect screenshots on all views that use it directly or indirectly.) In fact, less that 2% of our changes are actually rejected. Manually updating screenshot each time you make a change is a lot of friction.
But it’s also error-prone: if developers record screenshots from different devices (e.g. Mac vs Linux, or Intel vs ARM), you’ll likely see minor changes in the screenshot rendering.
So for an ideal workflow, we want to
- Automatically record screenshots on changes
- And just notify developers on Pull Requests when their PR changes screenshots
And this is where Screenshotbot comes in.
Using the Screenshotbot plugin with CPST
It’s actually pretty easy to set up Screenshotbot with CPST. First, create an account on screenshotbot.io.
Then, just add the Screenshotbot gradle plugin:
plugins {
    ...
    alias(libs.plugins.screenshot)
    id("io.screenshotbot.plugin") version "1.13"
}
And…, well that’s really it. We still need to provide API keys, but apart from that this is really it.
We also recommend adding your **/screenshotTest/reference directory to .gitignore, since we’re never going to save that to Git from now on.
For local development, the equivalent of update and validate is :app:recordDebugScreenshotTest and :app:verifyDebugScreenshotTest. But you can just use CPST. But you can still use CPST’s gradle tasks for local development.
In CI, you just need to call ./gradlew :app:recordAndVerifyDebugScreenshotTest. This will record screenshots, and upload it to Screenshotbot, without ever saving it in your repository. You also have to set up a SCREENSHOTBOT_API_KEY and a SCREENSHOTBOT_API_SECRET in your CI environment so that we can authenticate.
Getting notifications on PRs
At this point, you can already get value out of Screenshotbot: you’ll get email notifications each time you push a change that changes screenshots. You can also set up Slack notifications if you prefer. Notice that you don’t have to teach your colleagues anything about Screenshot testing, the CI job is intuitive and does not create any busy-work for them.
But you also want to notify developers for changes directly on their PRs. The workflow here varies depending on whether you use GitHub, BitBucket or GitLab. (We also support Phabricator and Azure DevOps, but these are the most popular integrations people use.)
At the end of this integration, you’ll get a pretty excellent notification on every PR that changes the UI:
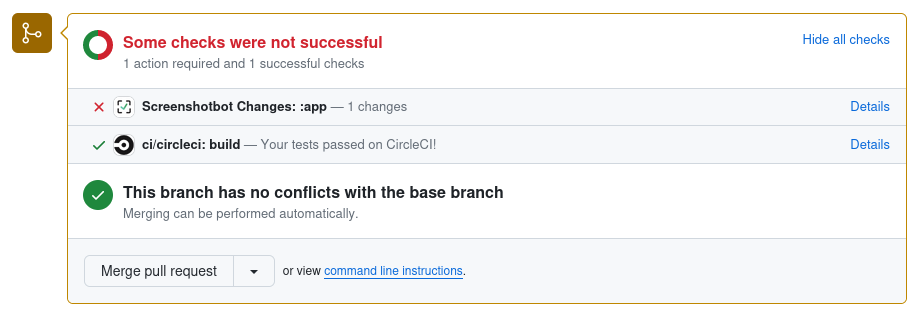
Developers can then review the screenshots, and just Accept the changes.
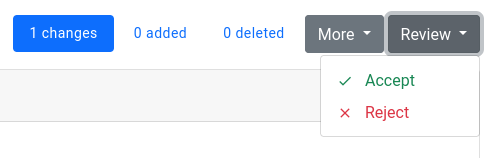
And once you accept the changes, your build turns green. It’s the best screenshot testing workflow you can ask for.
Links
Here’s a link to the code for this blog post: https://github.com/screenshotbot/compose-preview-example, and here’s an example Pull Request where Screenshotbot updated the PR: https://github.com/screenshotbot/compose-preview-example/pull/1
You might have also heard about people using GitLFS to store screenshots instead of Screenshotbot. This is a reasonable strategy, and Jose talked about all the pitfalls of this approach at Droidcon London: https://www.droidcon.com/2023/11/15/easy-screenshot-testing-with-compose/
Did you enjoy this post? Share the knowledge!